Tuesday, November 15, 2011

Gift 2, Bag

Today was just one of those days to get lost in my crafts, so I did. I found a bag online way back while surfing blogs that I liked and tried to recreate it as a gift for Christmas. I downloaded a photo of the bag, but I can't for the life of me remember which blog or which crafter made it. :( Sorry.

Drawing out the pattern was easy-ish. Although I will definitely make adjustments for future use when I make another one.

I used fabric from my stash that I've had for about 1.5 years, maybe more. I still have more of it left too, but definitely a smaller amount.

This bag will probably end up going to my Aunt Barbara since I know she loves the fabric choice. I really hope she likes it. :)

Monday, November 14, 2011

Quilt gift and Celebrating Color

Trying to decide whether to post gifts I've made that have not yet been given has been a hard decision. However, I don't think the person receiving this one will be seeing my blog, so I'm taking a chance and also entering into the Celebrating Color Event.

Here's my first lap quilt Christmas gift...and the very first Christmas gift of the season I've completed. I'm way behind.

The front of this lap quilt was made with 5" squares of fabric from my stash laid out in a random pattern surrounded by solid borders.


I had to purchase some additional solid yardage for the back, which I also pieced using fabric from the stash, borders and binding.


I decided to quilt it with cream thread in straight line quilting 1/4" from the piecing on the front and stitching the ditch on the borders.


I have to say, this is one of my favorite ever quilts that I've made. I just may have to mimic this with slight variations for other projects.

Check out the
Celebrate Color
and add your project today!

Tuesday, November 1, 2011

Christmas is Creeping Up on Me

While it's early November, Christmas is fast approaching. Before it makes its way, there'll be Thanksgiving, many Birthday's, including mine, and time spent with family and friends. But for Christmas, I have so many projects that I'm trying to complete for holiday gifts and am somewhat terrified about the time frame. Do you ever feel this way?

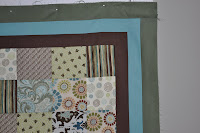
On the agenda for the next several weeks are 3 quilts, 4 monster pillows, a few other pillows and I'd love to make myself a quilt. See, I've made quite a few quilts since I began this journey in my life and I've yet to make me one that I can crawl up in and enjoy. I think I'll just do that soon. Many of the projects are simple yet time consuming and a few are more complex, but with a goal in mind, I must complete them. Here's a sneak peek at the quilt project I'm working on for one of my gifts.


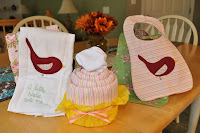
In addition to Christmas gifts, I also have a new niece supposed to arrive at the end of the year and have made a gift set for her. I used very girly fabrics and used applique and embroidery to complete her gift set of bibs, burp cloths, receiving blanket and onesie which I configured into a "cupcake". Hopefully Mom will love these specially handmade gifts.



I'm hoping to finish at least one quilt by Friday and maybe even I will have started on another. Wish me luck!

Monday, October 17, 2011

Projects Post It

Below are a few of the things I've worked on over the last few months. I know there is so much more to go along with these, including lots of cooking, but I haven't documented too much. I was lucky enough to have my nephew Aydan stay with me almost 2 weeks and we had such a blast. When he's at home, he plays the guitar with his toothbrush while singing to his favorite country music songs. I decided to see if I could make him a guitar that he could use instead of his toothbrush. I think it turned out adorable. See how cute he is strumming his new guitar?


I worked on a few projects for my Aunt Kay to give as baby shower gifts. Here's one of the gift sets for baby Meah. 3 burp cloths and a onesie. I think they turned out so sweet, don't you?


Somewhere along the way I found the time to make a baby blanket for my friend Kelley who had her baby girl in August. These blankets are amazing but defintely take a lot of time to sew them. I loved this one so much. It was hard for me to give it up. But, sweet baby Riley needed it. Hope she gets many years from this baby.


I began this blanket in June. It is for my nephew Cayden for his 4th birthday. Sorry to say I didn't get it finished until almost 1 month after his birthday. I really hate when I begin working on something and then just have no desire to complete the project. It took me several weeks to pull this one back out and complete it. It's ready to be mailed out to him ASAP. Especially with our weather turning so much colder now. Hope to get it to him next week.


A few more things that I'm working on or have completed will follow. These will be items completed/started in the last 2 weeks. Hope you all enjoy!

Friday, May 6, 2011

New Gift Project


Can you figure out what this is going to be?


If you guessed a bag, you were right!!! Here's some of the finished photos. This is going to my step-mom for Mother's Day.. A bit late though.


Friday, April 29, 2011

Circle Quilt

Several months ago, I cut out and sewed together the individual squares for the circle quilt below. It just wasn't doing anything for me at the time so I stashed it away for another day. I finally decided to pull it out on Tuesday and finish it. I just pulled a square from each pile alternating the styles until the top was completely pieced together.

Once finished, I decided I would try something completely foreign to me and that I have yet to figure out. The stippling stitch. I practiced for a few minutes on another project that I wasn't that worried about messing up and then I just dove right in. It took me about 10-12 hours over the last 2 days, but I finally finished this quilt. Now, I need to find out who it will go too.


Wreath to Adorn My Door

My front door has been bare for far too long. I have wanted something to spice it up and I found just the project.

Using dried lima beans, hot glue, a straw wreath, spray paint and a ribbon, I created this beauty. The ribbon can be changed with the season to create a similar yet different look.

Here it is hanging neatly on my front door:


I plan to change the ribbon since Easter has passed to a vibrant red.

Wednesday, March 16, 2011

Great Giveaway

The Moda Neptune Jelly Roll.


See this link: http://donnachurchillritter.wordpress.com/2011/03/12/my-100th-post-and-a-giveaway/#comment-484

For some reason links aren't working for me. Check out the link by copying and pasting into your browser.

Fabric Monsters

I wanted to do something fun for my 3 year old nephew that was coming to visit me last weekend with his mom and Grandma. I didn't have much time, so I decided I would try to make something small.

I created a stencil and got to work. Everything I used was from my stash.

Ultra cuddle fabric for the monster body.
Home Decor fabric for the eyes
Felt for the mouth
and regular cotton for the mouth and nose.

The end project was just cute as a button!


My sister-in-law loved it so much she asked for one for my niece. I finished it today. I think I like hers more.. shhhh don't tell. :) Hers has the cutest little bow and is so adorable.


Let me know what you think. Tasha

Wall Decor

I found these awesome directions online using freezer paper and fabric paint. I decided to give it a shot, but didn't want to paint on fabric. Instead I chose to try out freezer paper to canvas. It was pretty much like the same as the freezer paper to a cotton t-shirt.

All you need is
canvas
spray paint
image
freezer paper
iron
few books (for beneath the canvas center when ironing)
xacto knife
pencil or pen

So, you transfer your image to the freezer paper and then cut it out. Label the pieces as you cut them and on your original image so you know where the go when you want to lay them out. Place a book beneath the canvas and a piece of fabric to protect it. Then Iron the freezer paper cut outs to the canvas shiny side down.


Once you have finished, find a well ventilated area you can use to spray paint the canvas. Don't forget the sides of the canvas as well. Spray one coat and wait about 15 minutes and then spray another coat. Wait for 45 minutes to an hour and then check your project. Peel off the freezer paper and you have your finished Wall Decor Project.


Enjoy your new Wall Decor! Tasha

Monday, February 21, 2011

Placemats and Napkins

I have wanted to do something for the special people in my life so I'm slowly making my way through a list in no particular order. Currently I've been working on some placemats and napkins for my one of my best friends. It's a surprise so don't tell her! :) I finished up a 4 placemat set and decided to use the extra left over fabric to make some napkins of various sizes. Here are a few pics:


Front


Back


Placemats wrapped up with the various napkin sizes.


Memo Board

The memo board is finally complete and hanging on my craft room wall. Finally! Decided to use fabric buttons which was a little challenging, but after making almost 35 of them and sewing them to the intersections it has found a nice place on my wall!

I used the Moda Spirit Charm pack to make the memo board. I absolutely love how it turned out! If you want to make one, below is the tutorial information.


I used this tutorial found here Eva Patchwork Memo Board by Melissa Mortenson @ www.polkadotchair.blogspot.com

Wednesday, February 9, 2011

Pillows, Memo boards, Staining etc.

I've been working on several projects over the last 3-4 weeks my first I started was a circle quilt that I'm not sure if I'll ever finish.. Maybe it's the fabrics I used but I'm not sure.. but for some reason, I'm just not feeling it, so it's been set aside. See below:


Then I started working on a new project memo board. I found a few tutorials online and am have gotten to the "adding buttons" portion but haven't found the buttons I want to use yet.


I've also made several pillows for my bed and sitting room of my bedroom: Some are full pillows and some are slip cover pillowcases and also a table top for my new magazine nightstand:


Additionally, I have been staining the frame for the memo board a darker color and also staining a table that will be used in the sitting room of my bedroom once it's all ready.


Finally, I've started working on a project for a best friend of mine: Placemats for her table. Here's the first top I've put together.


I think I might have wanted a little instant gratification with the big/little projects that are all in progress right now at the same time. But at least I'm keeping busy and happy!

Friday, January 21, 2011

In the Spot Light


A spotlight of all the things crafty I've done today. :)

All of the little fabric pieces I cut using my new Accuquilt Go Cutter that my wonderful husband picked up for me for Christmas. I LOVE It! Now I'll have to make something with all of those girly squares.


Pom Pom - made with Yarn. Easy peasy- 2 minutes tops.


2 Baby Boy Burp Cloths


Wooden Magazine holder converted to "quilt style" fabric covered. I've had this on my list of things to do for a long time and decided to pull it out to do it while I was messing around in the craft room. Definitely time consuming, but I love the outcome. :)